Cat refuses to go in the carrier — a step-by-step plan that takes weeks, not a day.
, by Michael van Wassem, 5 min reading time
, by Michael van Wassem, 5 min reading time
Most cats don't hate the carrier itself. They hate what the carrier represents : stress, the car, the vet, strange smells. It's not a character problem, but an association problem. And you don't rewrite associations in one afternoon, but in phases—slowly, safely, and predictably.
This is a step-by-step plan that takes weeks, not a day.
What many people do: only grab the carrier on the day of the appointment, "push" the cat into it, close the lid, and get in the car. The cat learns: "this thing = panic".
Each time it gets worse, the resistance increases.
You can't train a cat into the carrier with willpower, but you can with predictability and micro-successes.
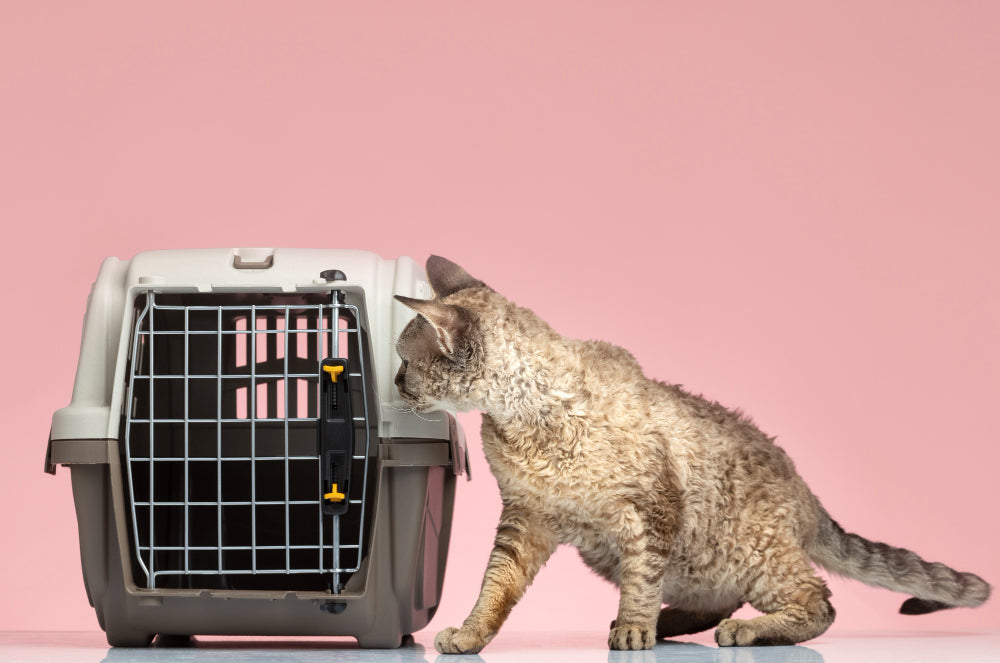
Not in the shed. Not in the attic. And preferably use a sturdy, partially enclosed transport box instead of a basket with a lot of open mesh. Cats feel safer in a "den" with boundaries, not in something that is open on all sides. Not "only when necessary".
The box needs to change from being a "threat" to being a "piece of furniture".
Leave the door open, never close it.
Neutral spot, not in the middle of the action.
No lingering scent of previous stressful ride (preferably cleaned).
Goal: the box becomes normal, both visually and mentally.
Cats don't go to "a box," they go to comfort.
Make the inside something your cat would voluntarily choose to go to.
Soft dress with its own scent
If necessary, something that smells like you.
Quiet environment, not next to a washing machine/noise.
Goal: the box becomes a resting place, not a trap.
Training on "getting involved" is too early. Start smaller: approaching = winning.
If the cat comes nearby, reward it for being calm (pet, voice, snack).
Does he step onto the edge with one paw? Reward him.
Is he halfway in? Reward him — but DON'T close!
Goal: the cat sets the pace, you reinforce closeness and voluntariness.
Only when the cat voluntarily enters the box (even briefly) should you start training the closing mechanism.
Close for 1 second and then open again.
One day later 3–5 seconds
In silence, without fuss.
Never lift it up immediately afterwards.
Goal: closing the door ≠ panic, but "brief and harmless".
Only then should you lift without driving.
Lift the box for 2 seconds → put it down
Next day 5–10 seconds
No additional stress factors (no need to put on a coat, no rattling keys)
Goal: movement is predictable and temporary, not a ride into misery.
Put the box in the car → no engine → put it back.
Day later: engine on → no ride → back
Then a short ride of 1–2 minutes.
No vet visit after the first short training session — break the pattern.
Goal: to teach the car and box as neutral/safe, not as the start of trauma.
Don't skip steps. Don't rush things "because you have to." Every step you force destroys the previous training. You're not training "transport," you're training trust—and trust has a memory.
Then the underlying driver is not an association, but for example:
pain (the cat associates being lifted with pain)
stress pile (too many triggers in the house)
difficulty breathing or motion sickness
panic attacks due to previous traumas
In those cases, extra support is often needed (medical or behavioral), but even then, only a process over weeks works — never a quick-fix in an afternoon.
A cat doesn't refuse a plastic box — it refuses what it thinks will come next.
Those who want to rewrite that image train not on transportation, but on safety. Check out all here.
Don't push.
Not all at once.
But slow, predictable, repeatable.
That's how you transform a carrier from a hostile place to a safe haven. Don't wait until something goes wrong to start looking for solutions. With a good foundation—a sturdy carrier that feels like a den and products that support stress reduction and recovery—you can make every future vet visit more predictable and calmer.